
Welcome back,
Today lesson will be highlighting us about the basis of the piano and how it works. As a beginner you must know how to defined a piano in your own understanding, so all i need is your attention and please take away anything that will distract you. Thank you!!!
Let's begin!!!!
THE PIANO

* it's making a sound
* maybe it's only a pianist that is allowed to touch it 🙊
There might be a lot running in your mind for the first time when you see a piano..☺
The question that come to your mind is WHAT IS A PIANO😒? Right!!
DEFINITION:A piano is a large keyboard (black and white colour) musical instrument with a wooden case enclosing a soundboard and metal strings, which are struck by hammers when the keys are depressed. The strings' vibration is stopped by dampers when the keys are released and can be regulated for length and volume by two or three pedals.
Let us do a little practical on the definition!!☺
Looking at the piano, you see the key which are made up of two colours which are black and white See image Fig 1.0 below

Now let us hit the keys with our fingers, you see it produce sounds. But how? Inside the piano there are hammers for each key that hit each key string when depressed causing them to produce a sound.
Note: it's only a grand piano that has hammers and strings. For instance the electric piano don't have any strings and hammers, they are programmed.
I hope u understand the definition, if not you should refresh your reading. Good luck!!!
NAMES OF THE PIANO KEYS
The White colour keys
The white keys on the piano have their name and they are name alphabetical order from A to G
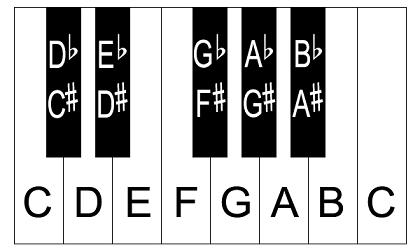
Looking at the diagram of the piano keys above, you will notice patterns like 2black keys and 3black keys.. Did you? Ok good!!!
Now first white key before the piano is named the "C KEY" the second key after the C is called D and the third key is called E
Now we have gotten to the white key before the 3black keys, the name of the key is F. The white key after F is G and the
white key after G is A and the white key after A is B then it continues with key C...
The Black colour keys
The black keys don't have a name, they are named accordingly to the white keys but they are called sharp of the white key when ascending and flat of the white key when descending..
The first black key after the C key is called C sharp because it is ascending and it's also called D flat when descending from D. when descending, the black are called the flat of the white key after them. for clearer understanding check mage fig 1.2 and fig 1.3


Key signature
Definition
The key signature of a piece of music is the sharps or flats listed after the clef. This is to avoid the repetition of accidentals in the score. They are listed on every line of music, which signifies what
key he/she has chosen.
TYPE OF SIGNATURE
* sharp sign (see image fig 1.4)
* flat sign (see image fig 1.5)
* Natural sign (see image fig 1.6)
Sharp sign
in musical notation,
sharp means "higher in pitch by a semitone (half step)," and has an associated sharp symbol, ♯, which may be found in key signatures or as an accidental. Sharp is contrasted with flat, which refers to a lowering of pitch.
Flat sign
In music, flat , or bemolle (Italian: "soft B") means "lower in pitch". In music notation, the flat symbol, ♭ derived from a stylised lowercase "b", lowers a note by a half step (semitone). Intonation or tuning is said to be flat when it is below the true pitch.
Natural sign
In musical notation, a natural sign (♮) is an accidental sign used to cancel a flat or sharp from either a preceding note or the key signature.


fig 1.5

To be continued
To get more lessons please follow blog...
Don't forget to place a comment.. Thank you all ☺
Nice one
ReplyDeleteWow very good keep it up brother. The few thing I saw I'm impressed.
ReplyDeleteThank you sir
ReplyDelete